

方案详情文
智能文字提取功能测试中
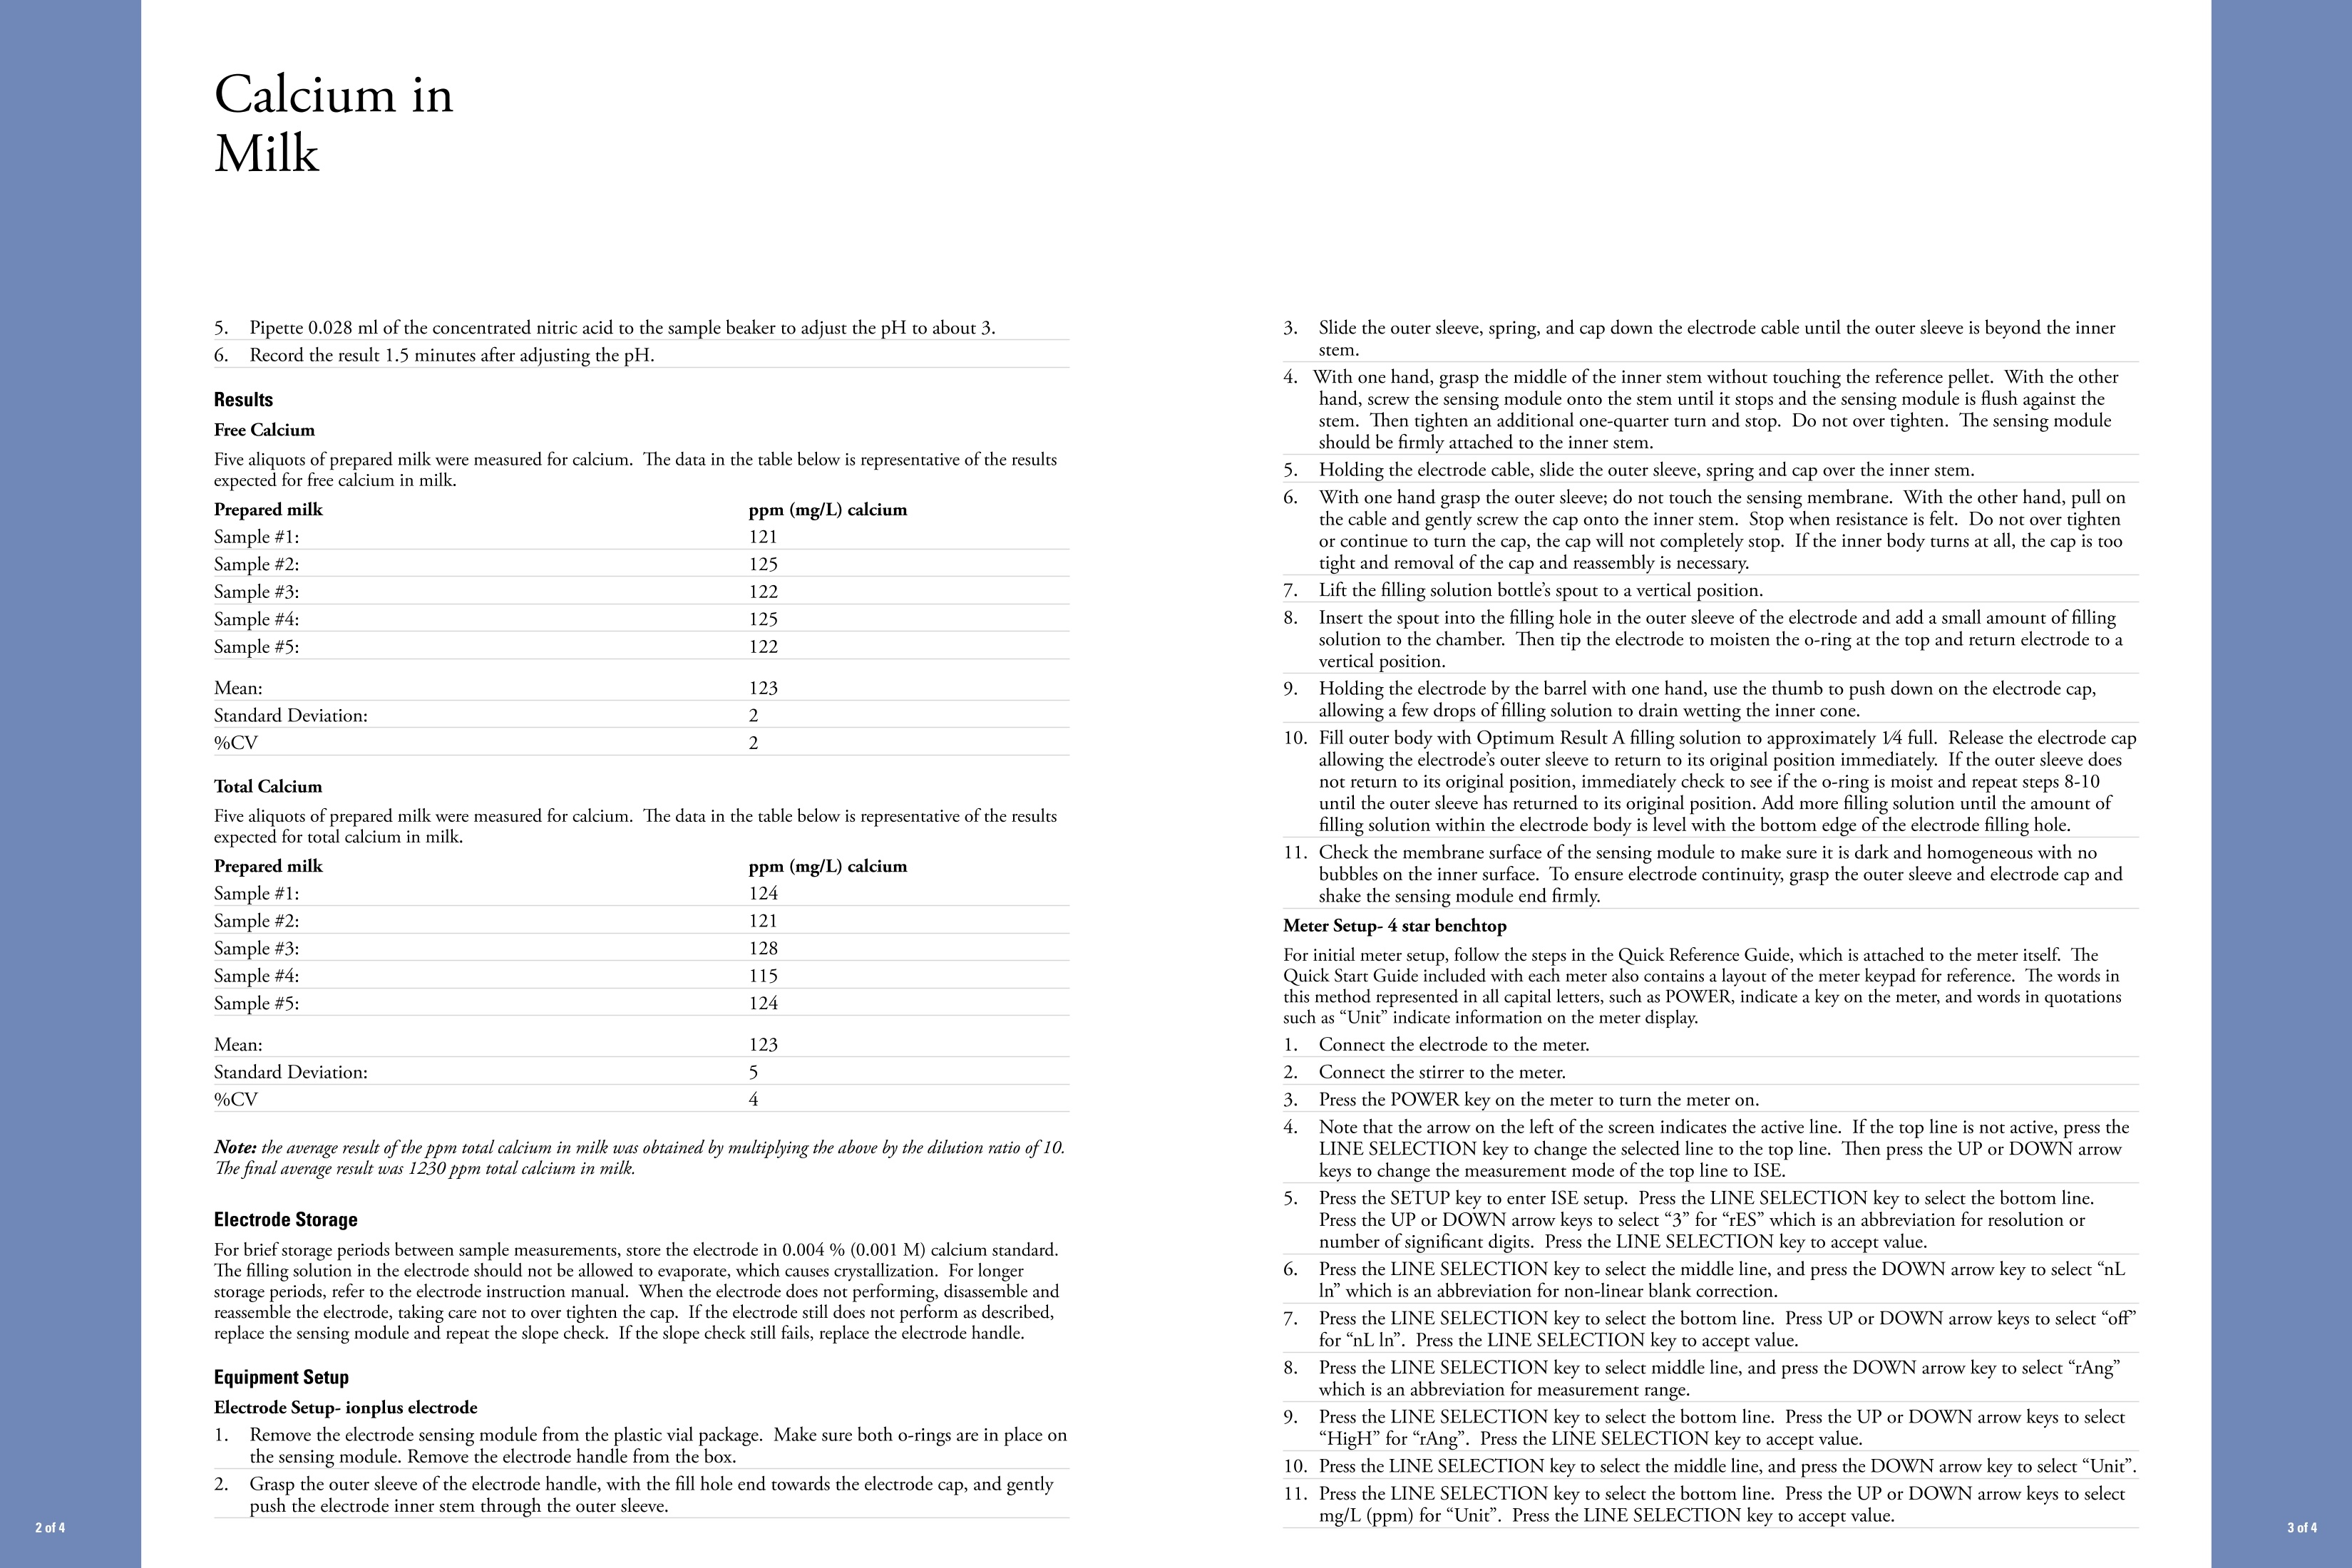
Calcium inMilkCalcium inMilk .Calcium inMilk 12. Press the MEASURE key to return to the measurement mode. If all steps were followed correctly themeter display will show three digits in the top line and"ISE: mg/L"to the right of the top line. Themeter and electrode are now ready for calibration. Note: The Orion Benchtop Stirrer must be turned on in General Instrument Setup before analysis, please see theQuickstart Guide for instructions. Calibration and Analysis 1. Allow all the standards and the samples to attain room temperature for precise measurements since themeasurement is temperature sensitive. 2.Calibrate the meter using the 100 ppm followed by the 1000 ppm standard, stirring the standards at agentle and uniform rate. 3.Place the electrode and stirrer into the beaker with the 100 ppm standard such that the electrode tip isfully immersed in the solution. The stirrer should be positioned slightly below the tip of the electrode.Press the STIRRER key on the meter to turn the stirrer on. Press the CALIBRATE key. 4.Wait for a stable reading (1-2 minutes). Enter the standard value of"100” using the UP and DOWNarrow keys and the DECIMAL/DIGIT key. 5.Press the CALIBRATE key to accept the 100 ppm standard and press the STIRRER key to turn thestirrer off. 6.Rinse electrode and stirrer thoroughly with deionized water. Gently remove excess solution from theouter sleeve of the electrode by dabbing with a clean paper tissue. Do not wipe or rub the sensingelement of the electrode. 7.Place the probe and stirrer into the beaker with the 1000 ppm standard such that the electrode tip isfully immersed in the solution. The stirrer should be positioned slightly below the tip of the electrode.Press the STIRRER key on the meter to turn the stirrer on. 8.Wait for a stable reading (1-2 minutes). Enter the standard value of“1000”using the UP and DOWNarrow keys and the DECIMAL/DIGIT key. 9.Press the MEASURE key to accept the 1000 ppm standard and to move to the measure mode of themeter. Press the STIRRER key to turn the stirrer off. 10. Rinse electrode and stirrer thoroughly with deionized water. Gently remove excess solution from theouter sleeve of the electrode by dabbing with a clean paper tissue. Do not wipe or rub the sensingelement of the electrode. 11. Place the probes and stirrer in a prepared sample with the electrode tip fully immersed in the solution.Press the MEASURE key on the meter; the stirrer will turn on. The ISE: ppm icon will flash as themeasurement is being made. The ISE: ppm icon will become solid and the display value will freezewhen a stable reading is achieved. This value is logged and printed automatically and the stirrer turnsoffautomatically. 12. Repeat steps 10 and 11 for additional samples. Upon completion of samples, rinse electrode withdeionized water and store the electrode according to instructions in the Electrode Storage section ofthis method note. Introduction Free and total Calcium contribute to the stability of skim milk proteins. Orion 9720BNWP calcium electrodeprovides an accurate way to directly determine ionized and total calcium in milk. The free-flowing Sure-flowjunction assures stable, drift-free potentials. In skim milk, free calcium levels are about 120 ppm and totalcalcium levels are about 1220 ppm. Specific instructions for the determinations are listed below. Recommended Equipment Cat. No. Calcium in Milk Application Package (includes all items with a catalog number) 1010134 1. 4 Star benchtop pH/ISE meter 1115000 2. ionplus calcium electrode 9720BNWP 3. Orion benchtop stirrer (or magnetic stir plate and bar) 096019 4. Orion benchtop electrode stand 1110001 5. Beakers (50 mL) 6. Graduated cylinder (50 mL) 7.Pipettes (1 mL, 10 mL and 25 mL glass), (0.028 mL digital) 2.Volumetric flasks (100mL and 250 mL) 9.Microwave, only for total calcium Required Solutions Cat.No. 1. 0.1M Calcium standard as CaCl, 922006 2.ISA (Ionic Strength Adjustor) for calcium electrode 932011 3. Reference Filling Solution, Optimum Results A 900061 4. Concentrate nitric acid (HNO,) (only for total calcium) 5. Deionized water Calibration Standard Preparation 1. To prepare a 1000 ppm calcium standard, pipette 25 mL of the 4000 ppm (0.1 M) calcium standard into a 100 mL volumetric flask. Add 2 mL calcium ISA into the same flask. Dilute to the mark with the deionized water. Mix well. 2.To prepare a 100 ppm calcium standard pipette 10 mL of the 1000 ppm calcium standard into a 100 mL volumetric flask. Add 2 mL calcium ISA into the same flask. Dilute to the mark with the deionized water. Mix well. 3.Using a graduated cylinder, transfer 30 mL of the 100 ppm and 1000 ppm calcium standards into the each 50 mL beaker. Sample Preparation Free Calcium 1.Add 2 ml calcium ISA to a 100 ml volumetric flask, and dilute to the mark with skim milk. Mix well. 2 Using a graduated cylinder, measure 30 ml of the sample into a beaker. Total Calcium 1 Using a microwave, cook about 50 mL of the skim milk for 6 minutes. 2.Allow the milk to attain room temperature for the sample preparation. 3. Pipette 10 ml of the cooked skim milk into a 100 volumetric flask. Add 2 ml calcium ISA to the same flask. Dilute to the mark with distilled water. Mix well. 5 Pipette 0.028 ml of the concentrated nitric acid to the sample beaker to adjust the pH to about 3. 6 Record the result 1.5 minutes after adjusting the pH. Results Free Calcium Five aliquots of prepared milk were measured for calcium. The data in the table below is representative of the resultsexpected for free calcium in milk Prepared milk ppm (mg/L) calcium Sample #1: Sample #2:Sample #3:Sample #4:Sample #5:123 Mean: Standard Deviation: 2 %cv .2 Total Calcium Five aliquots of prepared milk were measured for calcium. The data in the table below is representative of the results Prepared milk ppm (mg/L) calcium Sample #1: 124 Sample #2: Sample #3: Sample #4: Sample #5: 124 Mean: 123 Standard Deviation: 5 %CV .4 Note: the average result of the ppm total calcium in milk was obtained by multiplying the above by the dilution ratio of10.The final average result was 1230 ppm total calcium in milk. Electrode Storage For brief storage periods between sample measurements, store the electrode in 0.004 % (0.001M) calcium standard.The filling solution in the electrode should not be allowed to evaporate, which causes crystallization. For longerstorage periods, refer to the electrode instruction manual. When the electrode does not performing, disassemble andreassemble the electrode, taking care not to over tighten the cap. If the electrode still does not perform as described,replace the sensing module and repeat the slope check. If the slope check still fails, replace the electrode handle. Equipment Setup Electrode Setup- ionplus electrode 1.Remove the electrode sensing module from the plastic vial package. Make sure both o-rings are in place onthe sensing module. Remove the electrode handle from the box. 2. Grasp the outer sleeve of the electrode handle, with the fill hole end towards the electrode cap, and gentlypush the electrode inner stem through the outer sleeve. 3 Slide the outer sleeve, spring, and cap down the electrode cable until the outer sleeve is beyond the innerstem. 4 With one hand, grasp the middle of the inner stem without touching the reference pellet. With the otherhand, screw the sensing module onto the stem until it stops and the sensing module is flush against thestem. Then tighten an additional one-quarter turn and stop. Do not over tighten. The sensing moduleshould be firmly attached to the inner stem. 5. Holding the electrode cable, slide the outer sleeve, spring and cap over the inner stem. 6. With one hand grasp the outer sleeve; do not touch the sensing membrane. With the other hand, pull onthe cable and gently screw the cap onto the inner stem. Stop when resistance is felt. Do not over tightenor continue to turn the cap, the cap will not completely stop. If the inner body turns at all, the cap is tootight and removal of the cap and reassembly is necessary. 7. Lift the filling solution bottle's spout to a vertical position. 8 Insert the spout into the filling hole in the outer sleeve of the electrode and add a small amount of fillingsolution to the chamber. Then tip the electrode to moisten the o-ring at the top and return electrode to avertical position. 9. Holding the electrode by the barrel with one hand, use the thumb to push down on the electrode cap,allowing a few drops of filling solution to drain wetting the inner cone. 10. Fill outer body with Optimum Result A filling solution to approximately 14 full. Release the electrode capallowing the electrode’s outer sleeve to return to its original position immediately. If the outer sleeve doesnot return to its original position, immediately check to see if the o-ring is moist and repeat steps 8-10until the outer sleeve has returned to its original position. Add more filling solution until the amount offilling solution within the electrode body is level with the bottom edge of the electrode filling hole. 11. Check the membrane surface of the sensing module to make sure it is dark and homogeneous with nobubbles on the inner surface. To ensure electrode continuity, grasp the outer sleeve and electrode cap andshake the sensing module end firmly. Meter Setup-4 star benchtop For initial meter setup, follow the steps in the Quick Reference Guide, which is attached to the meter itself. TheQuick Start Guide included with each meter also contains a layout of the meter keypad for reference. The words inthis method represented in all capital letters, such as POWER, indicate a key on the meter, and words in quotationssuch as “Unit"indicate information on the meter display. 1. Connect the electrode to the meter. 2Connect the stirrer to the meter.34 Press the POWER key on the meter to turn the meter on. Note that the arrow on the left of the screen indicates the active line. If the top line is not active, press theLINE SELECTION key to change the selected line to the top line. Then press the UP or DOWN arrowkeys to change the measurement mode of the top line to ISE. .5. Press the SETUP key to enter ISE setup. Press the LINE SELECTION key to select the bottom line.Press the UP or DOWN arrow keys to select “3”for "rES” which is an abbreviation for resolution ornumber of significant digits. Press the LINE SELECTION key to accept value. 6 Press the LINE SELECTION key to select the middle line, and press the DOWN arrow key to select “nLln which is an abbreviation for non-linear blank correction. 7.Press the LINE SELECTION key to select the bottom line. Press UP or DOWN arrow keys to select “off’for“nL In". Press the LINE SELECTION key to accept value. 8 Press the LINE SELECTION key to select middle line, and press the DOWN arrow key to select “rAng"which is an abbreviation for measurement range. 9 Press the LINE SELECTION key to select the bottom line. Press the UP or DOWN arrow keys to select“HigH"for"rAng”. Press the LINE SELECTION key to accept value. 10. Press the LINE SELECTION key to select the middle line, and press the DOWN arrow key to select “Unit".11. Press the LINE SELECTION key to select the bottom line. Press the UP or DOWN arrow keys to selectmg/L (ppm) for “Unit". Press the LINE SELECTION key to accept value. www.thermo.com of of of of
关闭-
1/2

-
2/2
产品配置单

赛默飞中国实验室产品事业部为您提供《婴幼儿配方奶粉中钙离子检测方案 》,该方案主要用于婴幼儿配方乳粉中营养成分检测,参考标准《暂无》,《婴幼儿配方奶粉中钙离子检测方案 》用到的仪器有台式pH/ORP/ISE/溶解氧/电导率测量仪、Orion 4-Star台式(便携式)pH/离子浓度测量仪。
我要纠错
推荐专场
水质分析仪/多参数水质分析仪
更多


相关方案
 咨询
咨询